
This chapter contains the following topics:
Introduction to Data Entry, MySet and BreakOut
Data entry in PBS is done primarily with the keyboard. In this chapter the editing keys, default values, types of fields and editing fields with a mouse are explained in this chapter.
There are two types of data entry modes in PBS, Character and Graphical. Each type has different editing features.
MySet™ and BreakOut™ are utilities that allows users to set up default values. MySet, only available in Graphical mode, provides the setting of default sort fields on list boxes, field defaults for reports and for Administrative users to designate View-only screens for General users. BreakOut, only available in Character mode, allows users to set default values and skip fields.
Data entry is the primary method of getting data into PBS. It is needed for entering master files, transaction files and report criteria.
Data entry is mostly done with the keyboard. However, in Graphical Mode many fields can be entered with a mouse. This section explains the editing keys that you can use when entering a PBS field.
In some instances you may want to move data in and out of a PBS field using the mouse. The mouse options are also explained.
When on Windows or Thin client, a user may select <Sft+F12> to toggle from Character Mode to Full graphical or vice versa. There are a few restrictions to this feature:
You may not switch modes when adding a record or have a record selected in Character Mode, nor while adding or editing a record in Graphical Mode. If there are a sequence of screens, you may only make the change on the first screen as in Print checks and post in A/P.
Use the keys described below when entering the fields on a screen or when modifying a field through the prompt Field number to change ?.
The keys described in this table are for a Windows environment, but UNIX/Linux users, in most cases, have equivalent key strokes.
If you enter information into a field and make an error, use the Left or Right arrow key to return to the point of the error and make the necessary correction. Use the Right or Left arrow keys to return to where you were previously positioned. You can also use the <End> key to return to the end of the field.
Character Mode
With the Windows version of PBS you have several options of using the mouse on a field to change or select data. You can use the mouse when entering a new record or from Field number to change ? to edit a record. There are several left-click and right-click options.
A left-click of the mouse puts the cursor anywhere in the field and by dragging the mouse along the data, select any part of the field. From Field number to change ? a left-click of the mouse will select a field and make it available for editing.
Graphical Mode
You may use the mouse to select any field on the screen while adding a record. Certain key fields may not be editable when changing a record. In many cases you do not have to enter the fields in any particular order. As many fields are defaulted and some are not required, you may save a record before all the fields are accessed.
If you are adding, changing or viewing a record you may also access other tabs with the mouse.
The following are the available right-click options for editing the field with a mouse.
Options
|
Deletes the selected data and puts this data into memory. With the data in memory you can then paste the data into another field or in another open windows application. |
|
|
Puts the selected data into memory. With the data in memory you can then paste the data into another field or in another open windows application. |
|
|
Pastes the contents of memory into the field. If the data stored in memory is longer than the field will accept, then the data will be truncated to fit into the field. |
|
|
Deletes the selected data. |
|
|
This un-does any editing that was done on the field. You can only use this before you leave the field. Once you move away from the field the editing is stored in the file. |
|
|
This selects the entire contents of the field. This selection is only available if the field has not been or only partially selected. |
The calendar program works a little differently in Character Mode vs. Graphical Mode.
Graphical Mode
In graphical mode the calendar button displays to let you know that the calendar date selector is available. You may also use the <F4> key to access the calendar. You have the following options.
|
You can manually enter a date. |
|
|
This will display the Calendar control window. |
|
|
To escape from the calendar date selector window. |
Character Mode
On most date fields there is a calendar control function that provides an easy means of entering a date in PBS. This feature is only available if you are running PBS in a graphical mode.
You must be on a date field to access the Calendar control. To access the Calendar control selector, select the <F7> key. The date will now display differently and there will be a down arrow selector icon to the right of the field. You have the following options.
|
You can manually enter a date. |
|
|
This will display the Calendar control window. |
|
|
To toggle back to the non-calendar control date entry type. |
Once the Calendar window displays, then you have the following options.
|
Enter |
Hitting the Enter key will return the date back to the field. |
|
Down arrow |
Selects a date from the next week. |
|
Up arrow |
Selects a date from the previous week. |
|
Right arrow |
Selects the next day. |
|
Left arrow |
Selects the previous day. |
|
Page down and clicking on right arrow |
Selects a day in the next month. |
|
Page up and clicking on left arrow |
Selects a day in the previous month. |
|
Home |
Selects the first day of the month. |
|
End |
Selects the last day of the month. |
There are several types of errors that can be made while entering data. Nearly all of these errors (except typing errors) are verified by PBS. For each error, an appropriate message displays at the bottom of the screen or in a window describing the condition.
If the correction is not obvious, refer to the appropriate user documentation chapter, or to the Error Messages appendix in the PBS Administration documentation.
On some screens, a choice is displayed: …Blank = look up by name. For example, you can look up customers in Accounts Receivable by either customer number or name.
If you know the name of the customer (or vendor, etc.), but not the number, press <Enter> to leave the number blank. You can then enter the name, or just the first few letters of it. If you enter the first letters only, a search begins to find a name that matched. In Inventory Control, you can search for an item by number or description line 1.
A default is the value that is automatically selected. For example, in Control Information, you set default account numbers which can be used elsewhere. Later, you can change this default value or accept it.
There are instances in Passport Business Solutions where you accept the defaults by pressing <Enter>, <F2>, or some other function key. This assumes that <F2> is not being used for the First or Last in that field. For example, a date field often defaults to either today’s date (System date) or to the last date entered.
Function key options, <F1>, <F2>, <SF1>, etc., will usually display at the bottom of a screen. In Windows, you can also accept function key values by mouse clicking on the prompt itself. The prompt acts as a virtual button. In Character Mode be sure to click to the right of the < symbol to accept that prompt.
Questions requiring a yes (Y) or no (N) usually show the default in the field where your answer would appear if you typed a response. For example, Right customer ? Y (in graphical mode the focus will be on the Yes button). Press <Enter> to accept the default. If you do not want to use the default, type your answer instead (in the example, N for No).
Some default answers are displayed as a prompt or a pop-up prompt window near the bottom of your screen. For example:
<F2> = 31-11-6310-2010 MISC. EXPENSES
A common use of the <F1> default is when you see a prompt stating a choice:
<F1> = Next Entry, <F2> = Next Customer
Typically, <SF1> for previous entry and <SF2> for previous customer would also display.
Customer here is merely an example; the same logic applies when entering other master data such as employee, vendor, etc.
Notice that <F1> (and <SF1>) refer to an existing entry (whether for the same customer or for a different customer). When you press either of these keys, what you are going to get is a screen full of data, with the cursor positioned at Field number to change ? (unless indeed you are already located at the last, or first, entry on file, in which case you will get the message No next [or previous] customer on file).
On the other hand, when you press <F2> (or <SF2>), this is merely a shorthand way of entering into this field whatever happens to be the next (or previous) customer on file, whether or not there exists an entry for this customer. There is no implication that you are looking for either an existing or a new entry, and the cursor will be positioned at the next numbered field, not at Field number to change ? even if there really is an entry for the customer you have selected.
Often, a message like Enter account or <F2> = First account appears. First refers to the first account in the Account file. Last refers to the last account.
If the field (account in this example) requires a number, then First means the lowest-numbered account on file.
However, if the field requires an alphanumeric character, such as letters, numbers, and special symbols, as in a customer number or item number. First refers to the customer number or item number that would appear at the beginning of a sorted list. Last refers to the customer number or item number that would appear at the end of such a sorted list.
Sometimes you have a choice of defaults, with one being shown in the field (which you can select by pressing <Enter>) and the other perhaps an <F2> default (which you can select by pressing <F2>).
A common use for a choice of defaults is to define a range of data. You can either enter a starting number or press <F2> for First (first one on file). The cursor then moves to the ending range field, and a prompt appears with other choices.
|
Note |
On reports, if you enter a value for the starting field and you want the same value in the ending field, you can simply select the <Enter> key on the ending field and it will have the same value as the starting field. |
The PBS user documentation show the maximum size allowed for most entry fields. Where the formats are not given, one of the following two situations exist.
| 1. | If the format is obviously one character, the format may be omitted. For example, Y = Yes or N = No. |
| 2. | If the format is determined by entries made in your system, the format is omitted. For example, an account number or item number segment size was previously entered and now displayed. |
For alphanumeric fields, the number of characters allowed is shown. For example,
|
Format |
Up to 12 characters |
This indicates that you can enter up to 12 alphanumeric characters (numbers, letters and special symbols).
For numeric fields, the maximum number of digits is shown. For example, Format 99,999,999.99999 indicates that you can enter an eight digit number followed by a decimal point and up to five decimal digits.
If negative numbers are allowed, a negative sign is shown at the end. For example:
|
Format |
99,999,999.99- |
For fields that require a yes or no response, type either Y or N.
If a field allows decimal places, the decimal point must be entered if the digits to the right are not zero. For example, to enter twelve dollars and fifty cents, type either:
12.5 or 12.50. You must type the decimal point.
If the digits to the right of the decimal point are zero, you do not have to type either the decimal point or the zeros. For example, to enter twelve dollars, type either:
12, 12., 12.0, or 12.00.
If the digits to the right of the decimal point are zero and are not entered, the decimal point and the zeros display.
Type dates in the format MMDDYY (Month, Day, and Year - 6 numeric digits, with no slashes). For example, for October 9, 1999, type:
100999
The software re-formats this automatically to 10/09/99.
Dates are also checked for validity. A date such as February 30, 1999 (023099) or March 85, 1999 (038599) would be cited as an error. If you set the date parameters of your report for a specific period, you can not enter a date outside that period. For example, you may have set the parameters so that your report begins on December 31, 1998 (123198) and ends on March 31, 1999 (033199). To correctly enter April 21, 1999 in this report, you should type 042199. But in this case you would get a warning or error message because it is outside the parameters set for that report.
Dates are stored internally with a four-digit year.
You may also enter dates via the Calendar Control.
When you enter lowercase letters, they are sometimes changed automatically to upper case. This means that lower case letters are not permitted. Generally speaking, fields that contains descriptions, names, comments, narrative, or remarks allow both upper and lower case. Shorter fields that contains codes (for instance, units of measure like EACH or GAL) are converted to upper case.
Even where lowercase letters are permitted, you may wish to enforce case-sensitive standards of your own. This would ensure consistent placement of entries in sorted reports. The standard ASCII collating sequence does not sort a lower-case letter with its upper-case counterpart, but separates them widely from one another.
Press <Enter> to skip a field that does not require information. Alphanumeric fields are left blank. Numeric fields are set to zero.
For example, there might be three lines available for a customer address on the screen, but you need only two lines. Skip the third line by pressing <Enter>.
The BreakOut™ feature provides another way to skip fields.
Check boxes are only available in graphical mode. Here is an example:

When the focus is on the field, select the <Space bar> or using the mouse to enter check boxes. The <Space bar> will toggle the setting by either checking the box or unchecking it depending on the state it was previously. Selecting the <Enter> key will skip a check box at leave the default entry. The default may be checked or unchecked.
Using graphical mode, some fields have a list of choices. Here is an example of the 1099 type field from A/P Payables:
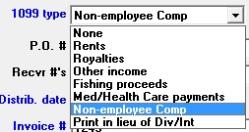
These choices are available via three selection methods:
| 1. | Use the mouse to select. Then select <Enter> or click on the next field |
| 2. | Enter the first letter of the list item you want to choose. Then select <Enter> |
| 3. | Use the up and down arrows to find your selection. Then select <Enter> |
A list normally defaults to one of the selections. However, there are some exceptions.
MySet is a system-wide tool that provides the following features:
| • | Each PBS user may set their default sorting option by screen for any list box used in graphical mode and the graphical lookups accessible in character mode. This saves mouse clicks when needing a sort option other than the default |
| • | A PBS Administrative user may designate any graphical mode screen as view-only, by company, for any General user. This is a security option that allows users to view data without editing it |
| • | Each PBS user may create default field settings for any Graphical mode report by company. This saves the time of entering fields that are always set the same way for any report |
The first two functions are documented immediately below. The third is documented in the MySet Field Defaults section.
The MySet selections are accessible from the Help menu on any Graphical mode screen or Lookup. Here is an example of a Help menu with a box around the first four MySet functions:
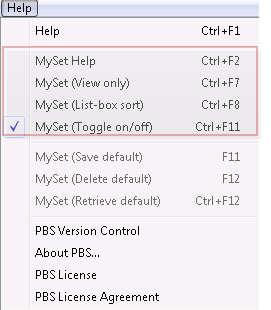
This is a brief description of each and when needed, a link for more detailed information:
| Menu | Keyboard Access | Description |
|---|---|---|
|
MySet Help |
Ctrl+F2 |
This accesses the help you are reading now. |
|
MySet (View only) |
Ctrl+F7 |
This allows a PBS Administrative user to set up a View only screens for any General user. This selection is grayed out for all General users. View only screens can only be accessed in graphical mode. See MySet (View only) |
|
MySet (List-box sort) |
Ctrl+F8 |
This allows both Administrative and General users to select a custom sort field for the list box on the screen. Only fields in red can be sorted. See MySet (List-box sort) |
|
Ctrl+F11 |
This turns MySet on or off globally for the user you are logged in as. You must turn MySet on before you can set up a default sort and to set up a general user with a read-only screen. See the note below for more information on the default setting. |
|
Note |
The default on/off setting is found on the PBS Users screen. That setting becomes the default whenever a user logs into PBS or changes companies. In order to change the default for any user, you must be a PBS Administrative user and you must do so accessing CTL - Setup -> User maintenance. The field is MySet on. |
You may read more about these functions below:
The MySet (View only) menu selection is accessible only by PBS Administrative users. It allows a PBS Administrative user to make many screens in PBS as View only for any General user. When a screen is set as View only, usually, the only button that will function is Exit. New, Edit, Save, Save/New, Delete and Cancel are grayed-out an inaccessible. If there is a special button like Distributions,it will be accessible. In all cases the distributions can be set as View only as well.
If there are multiple screens for one menu selection, like when entering Payables, Cash receipts, Orders or Invoices, you may set each screen separately. For example, the Orders header and Line items screens can be set to View only, while the miscellaneous charges/totals screen is not. This could be useful if you want to set up a user to only access the screen for entering the freight charges. For a list of screens that can be set to View only see the MySet View Only Menu List appendix.
General users can be restricted access to any menu selection. They can be assigned a full system menu. A screen can be set up as View only even if the user does not have access to the menu selection. To set up Menu selections by user and by company, see the Menu maintenance chapter in the PBS Administration documentation.
MySet (View only) Features
When a screen is set up for View only, the General user will be able to:
| • | View all the tabs on the screen |
| • | Select Print screen (Ctrl+P) |
| • | Select the menu selections at the top of the screen that are normally available |
| • | Exit the screen using the Exit button, selecting the <Esc> key or clicking on the "x" |
The General user will not be able to:
| • | Select the following buttons as they are grayed-out: New, Edit, Save, Save/New, Delete and Cancel. This means the user cannot add, edit or delete records |
| • | Access the screen in character mode |
Each screen may be set up differently by company or can be setup for all companies.
If there is more than one screen to a menu selection, in many cases each one may be set up separately as View only. This may be useful. For example, you may set up the Orders header screen and Lines screen as View only. For the Totals/miscellaneous charges you may allow the user to enter that screen so that the Freight charges can be updated.
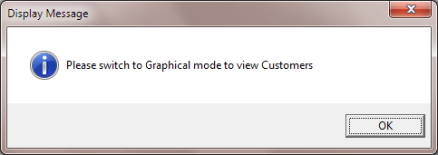
There is no function to allow View only in Character mode. If a PBS screen, set up as View only, is being accessed in Character mode or the user enters Shift+F12 to switch from Graphical mode to Character mode, a message similar to the following displays:
MySet (View only) Entry
While in Graphical mode you must first access the menu selection that you want to set as View only. In our example we are accessing the Customers (Enter) menu selection.
MySet must be on. If not, select it. See MySet (Toggle on/off) above.
Select
MySet (View only) from the Help menu. The following screen displays:
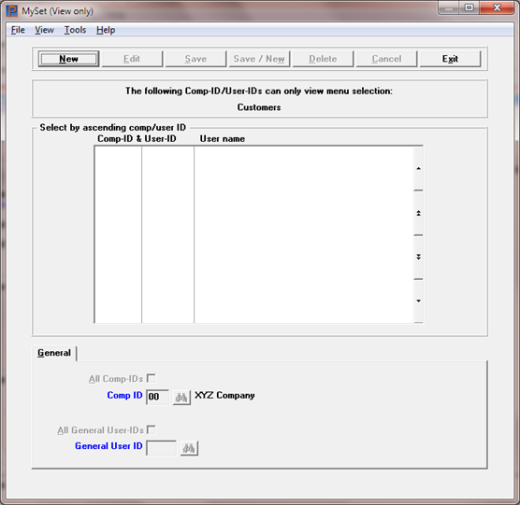
In a box at the top of the screen it indicates to you the menu selection you are accessing. In this case it is Customers, as seen below:

The list box displays up to 18 existing View only settings at a time. You may sort the list by Comp ID in ascending or descending order. Click on the column name or the arrow to the right of the column name to change the sort or use the View options. Only column names in red may be sorted.
To find a Comp ID via the list box, the focus must be on the list box (the data displays as blue). To locate a valid View only setting , start typing Comp ID. You may also use the up/down arrows, Page up, Page down, Home and End keys to locate the View only record. The <F1> and <SF1> keys function the same as the up/down arrow keys.
The Comp IDs that display in the list box are available for changes or deletion. The fields for the selected Comp ID display in the lower part of the screen.
When a Comp ID is found, you may select the <Enter> key or Edit button to start editing.
|
Note |
Comp ID is sometimes know as the company number. |
When you are adding or editing a view only record you have the following button options:
| Button | Keyboard | Description |
|
New |
Alt+n |
Add a new User ID with Comp ID |
|
Edit |
Alt+e |
Edit an existing record |
|
Delete |
Alt+d |
Delete an existing record. You may also use the <F3> key. |
|
Save |
Alt+s |
To save the record you added or edited |
|
Save/New |
Alt+w |
To save what you added or edited and start entering a new view only record |
|
Cancel |
Alt+c |
To cancel adding or editing a view only record |
|
Exit |
Alt+x |
To cancel adding or editing a record. You may also use the <Esc> key |
Enter the following fields on the general tab:
Check this box if you want this entry to apply to all Company IDs in PBS.
This defaults to un-checked.
If you selected All Company IDs in the previous field this field is skipped.
Enter the Company ID (number). You may click on the button or hit the <F8> key and select it from a list of Company IDs.
The default is the company you are currently accessing.
Check this box if you want this screen to be View only for all General users.
The default is un-checked.
Enter the User ID. You may click on the button or hit the <F8> key and select it from a list of users.
Save
When finished, select the Save button. For other button choices see MySet (View only) Buttons.
If you have a MySet View only record set up for one company and you enter another record for the same user for all Company IDs this message displays:
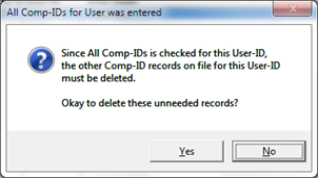
Select Yes to delete the record for one company or No to retain the record for the single company.
|
Note |
If you are an administrative user you have the option to copy My-Set View only selections from one user to another. This is done from User maintenance found under CTL Setup menu. Look for the MySet (Copy View only) selection found under the Help menu. You may read more about this function in the PBS Users chapter of the PBS Administrators doc. From that same menu selection you may also delete View only records. |
List boxes are found on many graphical screens and all lookups. Here is an example of the customer list box:

Each list box has a default sort and for many users the default is fine. But if you prefer that it is changed, the MySet (List-box sort) function will provide the capability to change it. Both Administrative users and General users can change the sort. You may select other sort fields (when available) and change back and forth from ascending to descending.
MySet must be turned on before you can use this function. See MySet (Toggle on/off)
To select a new custom sort setting, change the field and sort to your choice and select the MySet (List-box sort) on the menu. A check mark will display next to the menu selection indicating your custom sort has been set. In the example below the customer sort was changed to zip code:

Every time you return to this screen the sort will be by zip code.
If you want to remove the custom sort and go back to the default sort, then select the MySet (List-box sort) again, exit the screen going back to the menu and select the menu again. The default sort will display.
For any user default values for fields may be assigned to any report screens that can be run in Graphical mode. After you set the values for fields the next time you access the screen the default values display.
There are three selections from the Help menu that you may use for this function, as seen in the red box below:
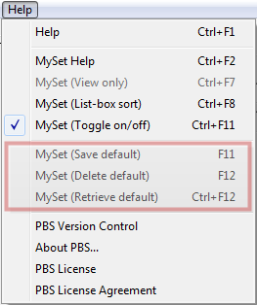
On screens other than reports, these selections will be grayed-out. Here is a brief description of each function:
| Menu | Keyboard Access | Description |
|---|---|---|
|
MySet (Save default) |
F11 |
This sets the current selected field to the default value that is entered in that field. The field will flash yellow to indicate that the value is being saved. |
|
MySet (Delete default) |
F12 |
This removes any default value for the currently selected field. The field will flash red to indicate that the value is being removed. |
|
MySet (Retrieve default) |
Ctrl+F12 |
This allows you to retrieve a value for a selected field. This is useful in case you changed the value to something other than the MySet default and you want the MySet default back. |
|
Note |
Other applications may also use function keys, like F11, F12, etc, as "Hot" keys for their processes or functions. When this is the case then you must use the PBS Help menu selection to generate the change or close the other application so that the function key is only being used by PBS. |
Often, after entering a value for a field it skips to the next field. It this case you will have to use the Shift+Tab keys to return to the field that you want to save the default. Alternatively, in most cases you may use the up arrow return to a previous field, unless you are on a drop down list. Then only Shift+Tab will work.
To change a default, you are not required to delete it. Just change the value and resave it.
Function keys cannot be saved as default values.
Date Fields
A default date may be set for a date field. A date field can be entered any one of the following ways:
|
50109 |
050109 |
05012009 |
5/1/9 |
|
05/1/9 |
5/01/9 |
5/1/09 |
05/1/09 |
|
5/01/09 |
5/1/2009 |
05/1/2009 |
5/01/2009 |
|
05/01/2009 |
|
|
|
Regardless of the way the default date is entered, it is saved that way, unless you select the ENTER key before saving it. When you select the OK button the program will validate the data. In the case of a date field it will be redisplayed as mm/dd/yyyy (Month, Day and Year).
System Multi-use Programs
Some screens are accessible from multiple menu selections. When you set a default for a program it will be setting it for another menu selection. One example is this screen:
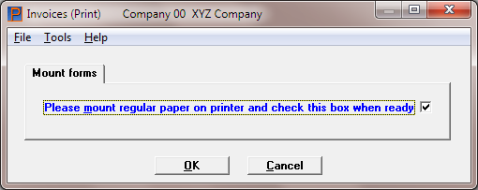
If you select a default of checked, then it will be checked whereever this question is asked.
Fields That Should Not have a Setting
Fields like Next check number, Next invoice number, Next order number should never be set with a default. If you do, then the system will try to post.
BreakOut is only available in Character Mode. BreakOut can be accessed from most Character Mode screens in PBS. The only exceptions are view-only windows, Field number to change fields, and utilities.
Many fields can be automatically entered with the help of BreakOut. BreakOut is a utility that allows you to tailor the data entry of PBS fields to the user’s specific needs. The process of entering fields on a transaction, report selection criteria or master file can be simplified by ‘instructing’ BreakOut to supply a default function key or value for and/or skip an input field.
BreakOut is user-specific and access is based on the User ID login into PBS. Each user can input their own BreakOut settings, but a PBS Administrator can set up BreakOut settings for other users. Also, BreakOut settings can be copied from one user to another by a PBS Administrator. This information is covered in detail in the PBS Administrative documentation.
Here are some of the options for setting up a field with Breakout:
| • | User specific values are set up for any field. BreakOut can be set up and therefore react differently for different users on the same field. BreakOut can be turned on or off globally for a user. |
| • | A default value can be displayed in a field. The user is able to change the value before entering the Enter key. |
| • | A default value can be auto-input and the field can be skipped. The user is not required to press the Enter key. In effect BreakOut types the value and ‘presses’ the Enter key for the user. |
| • | A function key or other ‘special’ key can be set for a field. It can also automatically ‘press’ Enter after selecting the key. |
| • | A field can be skipped without an assigned value or function key. In PBS there are instances where a user can select the Enter key without specifying a value and BreakOut can select the Enter key for you. |
BreakOut Maintenance is invoked by selecting the <F12> key. In Windows you can also access BreakOut by clicking on the BreakOut button.
The <F12> access to BreakOut can be turned off for the entire system by altering a setting in the cblconfi file. For altering this setting, see the PBS Administration documentation appendix called COBOL Configuration File. Turning off the access to BreakOut can have two useful purposes:
| 1. | You have everyone's BreakOut settings set up exactly the way they are needed and you don't want anyone to change these settings. Turning off the access denies anyone from changing their settings. |
| 2. | You do not want to use BreakOut on your system and prefer not to allow an accidental BreakOut setting after someone selects the <F12> key. |
Go to a PBS screen and on the first field select the <F12> key. The following window will display.
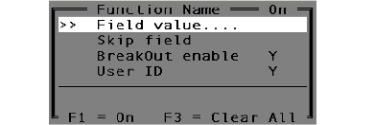
The BreakOut window consists of a menu of functions. You move from function to function by using the arrow keys or by pressing the first letter of a function. You can tell which menu line you are on because of the double ‘greater-than’ symbols and because the menu line is highlighted.
You can move the BreakOut window to any of four locations on the PBS screen by using the Right or Left Arrow keys.
Select the menu item and select functions and enter information as follows:
Field value
Set a value or function key for the current input field. This function is variable for any input field.
|
<Enter> |
To move the cursor to the Enter value field. |
|
<F1> |
Toggles the field value on or off. |
|
Format |
The BreakOut setting is variable based on the field length, type of field and the usable function key options for the field in which BreakOut is being assigned. |
When you select the <Enter> key from Field value your cursor will move to the Enter value field near the bottom of the window. Your window will now look like the following:
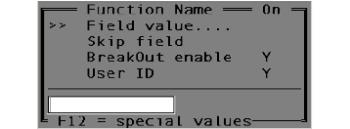
Depending on the field that you are on, you may be setting a function value or entering a value.
Options
Enter the field value or use one of the options:
|
<F12> |
For view and select one of the special function key values |
|
<F1> <F2> <F3> <F4> <F5> <F6> <F7> <F8> |
Select one of these function keys. When doing so the Field value will be the same as pressing this key. It will also auto-select the Skip field to be on. |
Selecting the <F12> key will display the following special key value window.
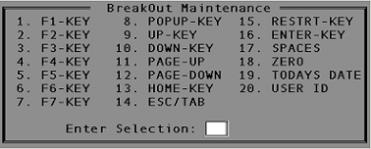
Select one of these special value options by entering the number to the right of the option. The following table categorizes the special key types and values.
BreakOut Key Types and Values
|
Function keys |
Cursor control keys |
Processing keys |
Default field values |
|
1 F1 |
9 Up |
14 Esc |
17 Spaces |
|
2 F2 |
10 Down |
15 Restart |
18 Zero |
|
3 F3 |
11 PageUp |
16 Return |
19 Today’s date |
|
4 F4 |
12 PageDn |
|
|
|
5 F5 |
13 Home |
|
|
|
6 F6 |
|
|
|
|
7 F7 |
|
|
|
|
8 F8 |
|
|
|
The default field value of Today’s date can only be used on a date field.
Set a value or function key for the current input field. This function is variable for any input field.
The skip field has one function key option.
|
<F1> |
Toggles the skip field function on or off. |
When the skip field function is used, BreakOut will automatically ‘enter’ the assigned field value or special function key.
|
Note |
You should never use the Skip field function on the first field of a screen or window because it puts the program into a loop always trying to get to the next field. If you do, then you can not get back to the first field to enter a new record or to exit the screen. If this ever happens do the following: 1. Log into PBS as the same user. 2. Access BreakOut by selecting <F12> from any field, but not on the same screen where the looping is occurring. 3. Arrow down to the BreakOut enable field and select <F1> to disable BreakOut. 4. Go to the screen where the Looping is occurring and select <F12> on the field. 5. Remove the skip field by selecting <F1>. 6. Switch BreakOut on by accessing the BreakOut enable field and selecting <F1>. |
The skip field function can also be used without a field value being assigned. However, many fields in PBS require a field value and can not be blank. You can only skip a field without a field value if it is OK to leave the field blank. In most cases a date field can not be left blank.
Selecting the <F1> key this turns BreakOut on or off for the entire system for this user. Other users are not effected by this switch.
|
<F1> |
Toggles BreakOut on or off for this user. |
Another way to toggle BreakOut on or off is to select the <F11> key twice without selecting any other keystroke or mouse click. The same function applies when clicking on the BreakOut button twice.
|
Note |
Turning BreakOut off is useful when you want to do a one-time edit of a field that has been set to skip, but you need to get to the field to edit it, It is also useful if you need to change the BreakOut field value skip field setting. |
When the arrows are pointing to this field, you can view the User ID for which you are logged it. The user ID displays on the bottom line of the BreakOut window.
If you are a general user, then you can only view your User ID.
If you are an administrative user, you can enter a PBS User ID and then add, change or edit a BreakOut setting for that user. Select the <Enter> key at the User ID field and then enter the User ID. Select the <Enter> key again to accept the entry. You are now ready to enter BreakOut settings for that user.
|
Note |
There is a way for a PSI Administrator to copy BreakOut settings from one user to another. For instructions on doing this go the PBS Users chapter of the PBS Administrator documentation. |
Clear All
You can remove the Field value and the Skip field option for the field that you are on by selecting the <F3> key.
|
Note |
For more information read the tutorials on setting up BreakOut in the appendix of this documentation. |